Your SolarEdge inverter error code is telling you something specific went wrong — and in many cases, it’s not as serious as it looks. Some codes clear themselves automatically when grid conditions stabilize. Others signal a real problem that needs professional attention. This guide breaks down the most common SolarEdge error codes in plain English and helps you decide what to do next.
How to find your SolarEdge error code
Before you can troubleshoot, you need to know exactly which error code your system is displaying. SolarEdge inverters store error information in two places, and the format varies depending on your inverter model and firmware version.
On the inverter itself: If your inverter has an LCD screen (common on older SE-series models and some HD-Wave inverters), press the button on the front of the unit. The screen will cycle through status displays, including any active error codes. Newer models without a screen rely entirely on app-based diagnostics.
In the monitoring platform: Log in to monitoring.solaredge.com or open the mySolarEdge app. Navigate to your system’s Events tab to see a log of all faults, including timestamps. This is the most reliable way to catch intermittent errors that may have already cleared.
Using SetApp: The SolarEdge SetApp mobile app connects to your inverter via Bluetooth and provides live diagnostics, including error codes, isolation resistance values, and string-level performance data. You need to be within a few meters of the inverter to use it. SetApp is now being integrated into a new tool called SolarEdge Go, which combines commissioning, monitoring, and diagnostics in one app.
Write down the exact code you see — including any letters, numbers, or “x” placeholders (like 18×37 or 2×19). The code format tells you which subsystem triggered the fault and helps you look up the right troubleshooting steps.
Understanding SolarEdge error code formats
SolarEdge uses different error code formats depending on your inverter’s firmware version. Knowing which format your system uses makes it easier to interpret what you’re seeing.
Older firmware (CPU v3.18xx and earlier): Simple numeric codes like 4, 6, 14, or 24. These appear on the LCD screens of legacy SE-series inverters installed before approximately 2018.
Newer firmware (CPU v3.19xx and later, including 4.x): Alphanumeric codes like 2×1, 8×37, 18×75, or 18xB7. The “x” is a placeholder that represents a variable digit specific to your system. These codes appear on HD-Wave inverters and newer models with SetApp support.
The monitoring platform often translates codes into plain-English descriptions like “Isolation Fault” or “AC Voltage Too High.” That’s helpful for understanding the general issue, but you still need the numeric code if you’re calling support or searching for detailed troubleshooting steps. If you’re not sure which firmware version you’re running, check the inverter label or log into the monitoring platform and look under device settings.
Common SolarEdge error codes: What they mean
Here are the error codes SolarEdge system owners see most often, organized by severity and what’s actually happening inside your system.
Grid-related errors (usually temporary)
Error 6 (or codes 18×37, 18×38, 8×36): Grid voltage fault. This is the most common error code on SolarEdge systems. It means the inverter detected AC voltage from the utility grid that’s either too high or too low for safe operation. In most cases, this clears automatically once grid conditions stabilize — usually within 5 to 10 minutes. If you see this error repeatedly at the same time of day, it may indicate a local grid issue or high solar adoption in your neighborhood pushing voltages up during peak production hours. Contact your utility if the problem persists.
Error 24 (or 18xD8): Grid overvoltage. Similar to Error 6, but specifically indicates voltage above the configured country limit. The inverter shuts down to protect itself and your home’s electrical system. This often happens in areas with high solar penetration where multiple systems are exporting power at once. Some utilities allow installers to adjust grid protection settings within approved ranges, but this requires professional reconfiguration — don’t attempt it yourself.
Isolation and ground faults (call a professional)
Error 14 (or codes 2×19, 18×86, 25): Isolation fault. The inverter detected insufficient electrical isolation between your solar array’s DC wiring and ground. This can be caused by damaged wire insulation, moisture intrusion in junction boxes or connectors, a faulty power optimizer, or even a cracked solar panel. SolarEdge inverters check isolation resistance every time they start up — the system won’t produce power if resistance falls below 600 kΩ (single-phase) or 1 MΩ (three-phase). Do not reset the system without a qualified solar technician inspecting the DC wiring. Isolation faults can indicate a shock hazard.
Ground current or RCD errors (multiple codes including 18x3D): Earth leakage current detected. This is a safety shutoff triggered when the inverter senses current flowing to ground that shouldn’t be there. Like isolation faults, this can signal damaged wiring or compromised insulation. Do not attempt to restart the system — contact your installer or a licensed electrician immediately.
Arc faults (do not ignore)
Error 12 (or codes 3×2, 18xC): Arc fault detected. SolarEdge inverters include built-in arc fault detection to identify dangerous electrical arcing in the DC wiring — a potential fire hazard. Arc faults are usually caused by loose connections, damaged cables, or failed connectors. Never reset the system after an arc fault without a professional inspection. The issue won’t resolve itself, and repeated arcing can lead to equipment damage or fire risk. If you’re under warranty, this repair should be covered.
Temperature errors (often self-clearing)
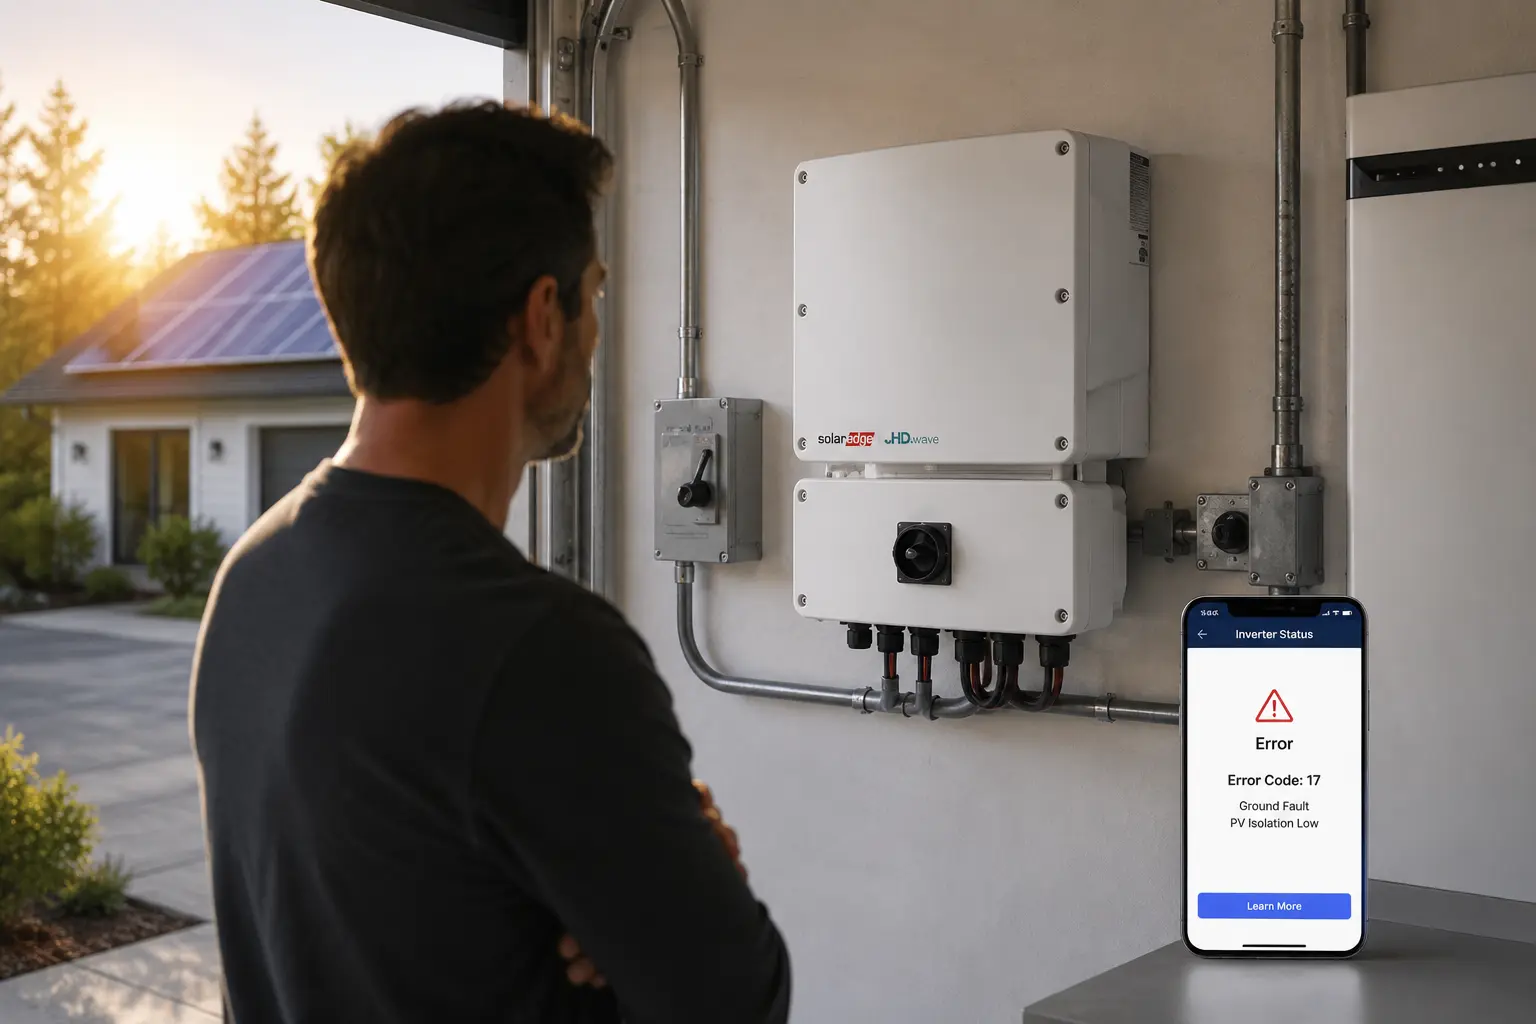
Codes 17, 18×75, 2×11: Over-temperature shutdown. The inverter got too hot and shut down to protect internal components. This can happen during heat waves, if the inverter is installed in direct sunlight without adequate clearance, or if cooling fins are blocked by debris. Once the inverter cools down, it should restart automatically. If you see this error frequently, check that your inverter has the required clearances (typically 6 inches on all sides) and that vents and heat sinks are clean. Persistent overheating may indicate a failing cooling fan or internal component issue.
Communication and hardware errors
Monitoring offline or communication errors: These don’t stop production, but they mean your inverter isn’t uploading data to the SolarEdge monitoring platform. Check that your router is online, the Ethernet cable or Wi-Fi connection is secure, and the communication LED on the inverter is solid green. SetApp will still show live data even when cloud monitoring is offline.
Hardware and RMA-related codes (18xB5 through 18xB9): Internal inverter fault. These indicate a component failure inside the inverter itself — not something you can fix. Contact SolarEdge support or your installer to initiate a warranty claim. Most SolarEdge inverters come with a 12-year warranty, extendable to 20 or 25 years.
For a complete list of error codes and official troubleshooting steps, refer to the SolarEdge error codes documentation on the manufacturer’s knowledge center.
Using SetApp to diagnose inverter problems
SetApp is SolarEdge’s mobile diagnostic tool, and it gives you far more detail than the monitoring platform alone. If you’re troubleshooting an error code, SetApp can show you isolation resistance values, string-level voltage and current, optimizer status, and real-time fault logs — all from your phone.
How to connect: Download the SetApp app (iOS or Android), enable Bluetooth, and stand within a few meters of your inverter. Tap “Pair New Device” and scan the QR code on the inverter or enter the serial number manually. You don’t need an internet connection — SetApp communicates directly with the inverter via Bluetooth.
Key diagnostic screens: Once connected, navigate to Status > Troubleshooting to see active error codes and warnings. Under Maintenance > Diagnostics > Isolation Status, you can view the exact isolation resistance reading in kΩ — helpful if you’re dealing with an isolation fault and want to monitor whether the value is improving or getting worse. The Layout screen shows all power optimizers in your array and flags any that aren’t communicating or producing power.
SetApp is particularly useful for intermittent errors that don’t show up consistently in the monitoring platform. You can check live system status without waiting for cloud updates. SolarEdge is currently rolling out a new app called SolarEdge Go that will eventually replace SetApp and Mapper, combining installation, monitoring, and remote diagnostics into a single platform.
If your installer needs to troubleshoot remotely, they can often diagnose issues using the monitoring platform’s event logs and your real-time SetApp screenshots — no site visit required in many cases. That said, isolation faults, arc faults, and hardware failures almost always require an in-person service call.
When you can reset your inverter yourself
Some SolarEdge error codes are temporary and safe to clear with a power cycle. Others indicate a serious safety issue and should never be reset without professional inspection. Here’s how to tell the difference.
Safe to reset: Grid voltage fluctuations (Error 6, 18×37, 18×38), over-temperature shutdowns after the inverter has cooled (18×75), and communication errors that don’t affect production. These are typically caused by external conditions — not a problem with your equipment.
Never reset without a pro: Isolation faults (Error 14, 2×19, 18×86), arc faults (Error 12, 18xC), ground current errors (18x3D), and any code that warns of electrical shock hazard. Resetting these without fixing the underlying issue can create a safety risk or cause further damage.
How to safely reset a SolarEdge inverter
If you’ve determined the error is safe to clear, follow this sequence exactly:
- Turn off the AC disconnect switch (usually a breaker in your main panel or a dedicated disconnect near the inverter).
- Turn off the DC disconnect switch (located on the inverter itself or near the solar array). On most SolarEdge inverters, this is a red switch on the bottom labeled “P/1/0” — move it to the “0” (off) position.
- Wait at least 5 minutes for the system to fully power down. If your inverter has an LCD, watch for the DC voltage to drop below 50V. If there’s no display, just wait the full 5 minutes.
- Turn the DC disconnect back on (switch to “1” or “ON”).
- Turn the AC disconnect back on.
- Wait while the inverter reboots. You’ll see the status LEDs cycle through blue and green. The system will go through a grid monitoring phase before resuming production — this can take several minutes.
If the error reappears immediately or within a few hours, do not reset again. Contact your installer or a licensed solar service provider. Repeated faults mean there’s an underlying issue that won’t resolve with a reboot. For help finding a qualified technician, visit our installer directory or check if your original installer is still in business using our installer closure guide.
What to do if your installer is unavailable
If your original installer is out of business, unresponsive, or you’ve moved to a new home with an existing system, you’re not stuck. SolarEdge systems can be serviced by any qualified solar technician — you don’t need to go back to the original company.
Start by checking whether your inverter is still under warranty. Most SolarEdge residential inverters include a 12-year standard warranty, with optional extensions to 20 or 25 years. If you’re within the warranty period and the error code indicates a hardware failure (like the 18xB7 or 18xB9 codes), you can open a warranty claim directly with SolarEdge. You’ll need your inverter serial number, purchase date, and a description of the fault. SolarEdge may authorize a replacement unit and provide guidance on finding a local installer to perform the swap.
For non-warranty issues or situations where you need diagnostic help, use our solar installer directory to locate a service provider in your area. Look for companies that specifically advertise SolarEdge service and repair — many installers focus only on new installations and won’t take on service work for systems they didn’t originally install. When you contact them, have your error code, inverter model, and system details ready. If you’re buying a home with an existing SolarEdge system and want to understand what you’re inheriting, read our guide on buying a home with solar panels.
In some cases, particularly with older systems, you may encounter outdated solar technology that’s harder to service or no longer supported. If your inverter is more than 10–12 years old and experiencing repeated failures, replacement may be more cost-effective than ongoing repairs — especially if you’re outside the warranty period.
Troubleshooting isolation faults (Error 14) in detail
Isolation faults are one of the most common reasons a SolarEdge system won’t produce power, and they’re also one of the most misunderstood. Here’s what’s actually happening and how professionals track down the source.
Every time your SolarEdge inverter powers up, it measures the electrical resistance between the DC wiring (your solar panels and optimizers) and ground. If that resistance is too low — below 600 kΩ for single-phase inverters or 1 MΩ for three-phase systems — the inverter assumes there’s a fault and refuses to operate. Low isolation resistance means current could be leaking to ground, which is a shock hazard and a sign of damaged insulation somewhere in the system.
Common causes include water intrusion in a junction box or connector, a cracked solar panel allowing moisture inside, damaged wire insulation (often from rodents or improper installation), or a failed power optimizer. Isolation faults are more common in the morning after heavy dew or rain, because moisture temporarily lowers resistance. If your system shows an isolation fault in the morning but clears by midday, that’s a strong indicator of a moisture-related issue.
Technicians diagnose isolation faults using an insulation resistance tester (megohmmeter) and a process of elimination. They’ll disconnect strings one at a time, measure resistance, and narrow down which part of the array is causing the fault. According to SolarEdge’s official isolation fault troubleshooting guide, DC cables should measure at least 200 MΩ, and any reading below that indicates a faulty cable that needs replacement.
This is not a DIY repair. Isolation faults involve live DC circuits, and working on them without proper training and equipment is dangerous. If you see Error 14 or any variation of “isolation fault,” contact a licensed solar technician. Do not attempt to restart the system or bypass safety interlocks.
Frequently Asked Questions
Final Thoughts
SolarEdge error codes exist to protect you, your equipment, and your home. They’re not designed to frustrate you — they’re the inverter’s way of saying “something’s not right, and I’m not going to operate until it’s fixed.” In most cases, particularly with grid-related faults, the issue resolves on its own. But when an error persists or involves isolation, ground current, or arc faults, professional help isn’t optional — it’s a safety requirement.
The good news is that SolarEdge systems are highly diagnosable. Between the monitoring platform, SetApp, and the detailed event logs the inverter keeps, technicians can often identify the root cause quickly — sometimes without even visiting your property. That’s why it’s so important to document the exact error code, note when it occurs, and communicate that information clearly when you reach out for help.
If your system is under warranty and you’re facing a hardware failure, SolarEdge support can guide you through the RMA process. If you’re dealing with wiring or installation-related issues, you’ll need a qualified solar service provider. Either way, don’t let an error code sit unresolved for weeks. Lost production adds up, and some faults — particularly isolation and arc faults — can worsen over time if ignored. For help finding a trusted local installer who can service your SolarEdge system, visit our installer directory.